
OIDC With AWS
How to authenticate the env0 runner using AWS and OIDC
This guide is to help you connect to AWS with OIDC, instead of using a static API Key and Secret.
Overview
This guide will show you how to create an AWS Identity Provider and IAM role to go along with it, and configure env0 to utilize OIDC. This will allow you to authenticate to AWS and get temporary credentials by accepting env0's OIDC token. Refer to env0's OIDC configuration for more information
AWS Identity Provider and IAM Role
To be able to authenticate with OIDC, we will need to create an Identity Provider in your AWS account and attach an IAM role to it. We will follow this guide by AWS.
Create an Identity Provider
- Login to your desired AWS account and go to Identity and Access Management (IAM)
- In the left side menu under Access management, click on Identity Providers
- Click on Add provider
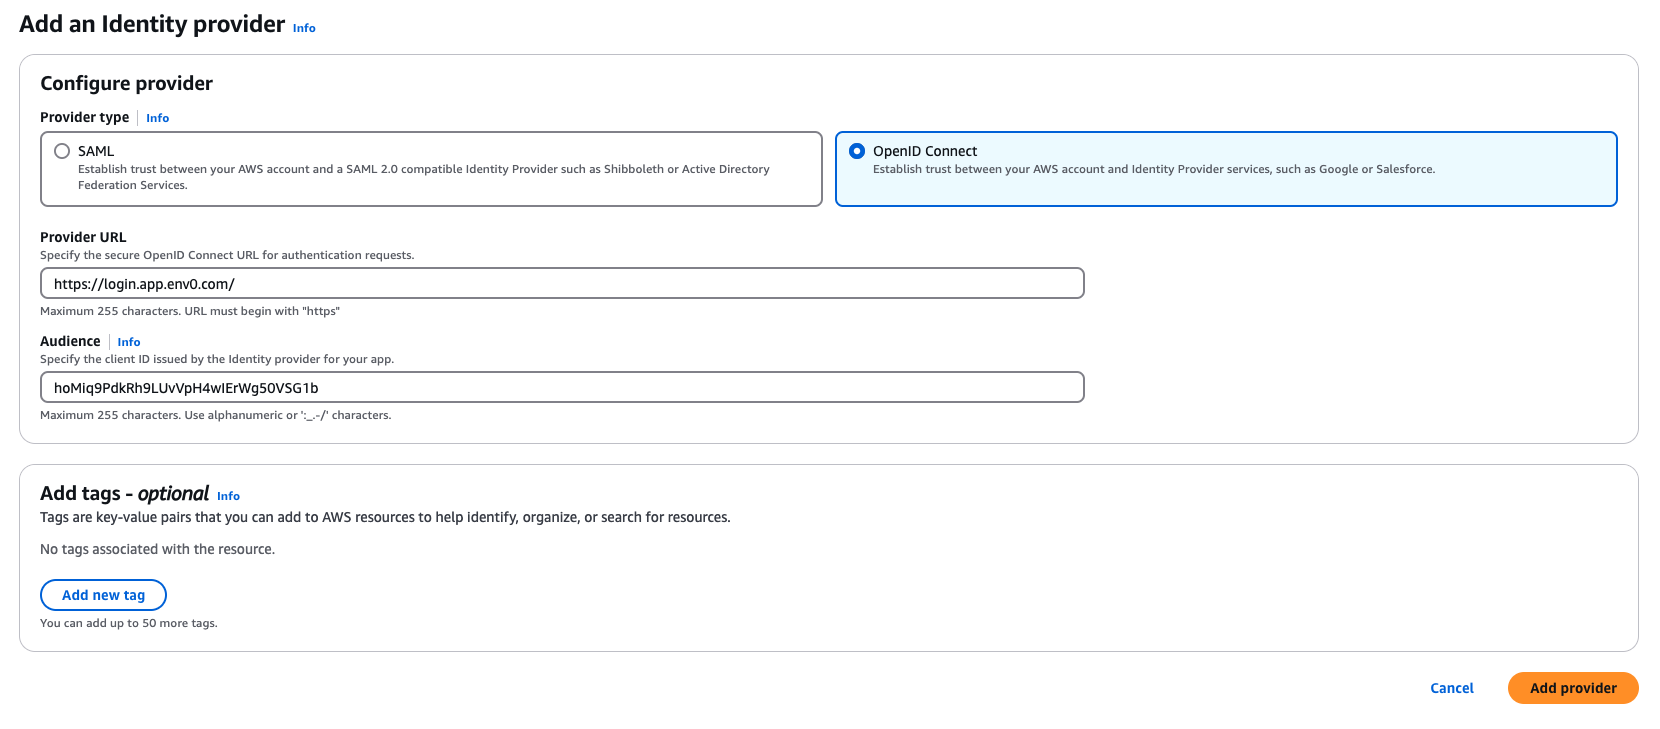
- Choose the OpenID Connect option
- For Provider URL, enter https://login.app.env0.com/ and click Get thumbprint
- Under Audience, enter
hoMiq9PdkRh9LUvVpH4wIErWg50VSG1b - Add tags if you wish, then click Add provider to create the identity provider
Add an Identity Provide
Assign an IAM Role
- Go to the Identity Provider you created in the previous step
- In the Audiences section, select
hoMiq9PdkRh9LUvVpH4wIErWg50VSG1bthen click on the Actions button and select Assign role - Select the Create a new role option which will open the Create role wizard
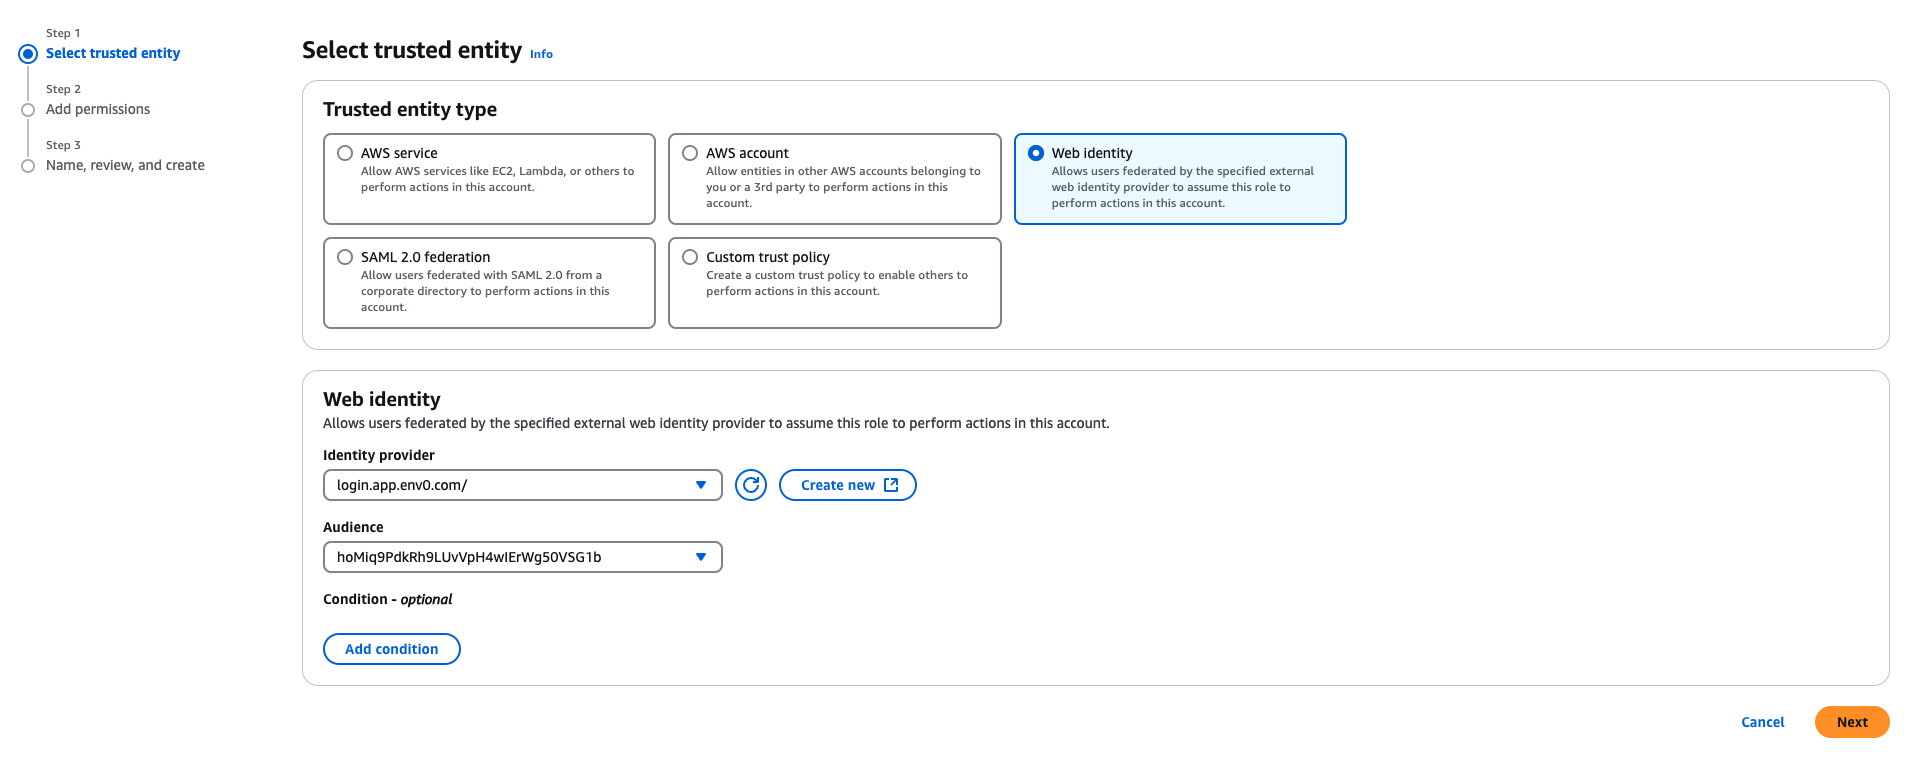
- Select the Web Identity option. Under Identity provider select
login.app.env0.com/:audand under Audience selecthoMiq9PdkRh9LUvVpH4wIErWg50VSG1bthen click Next: Permissions - In the permissions phase, select the permissions you would like this role to have. Remember, these permissions will be used to deploy your IaC so make sure they match the permissions your code needs.
- Add tags if you wish
- In the Review phase, give the role a name and a description, then click Create role
Add Role
Add a sub Claim
sub Claim- Retrieve your organization
subidentifier using this guide - Go to the AWS IAM role you created in the previous step
- In the Trust Relationships tab, click Edit Trust Policy
- Under the Action section, add the following:
sts:AssumeRoleWithWebIdentitysts:TagSession
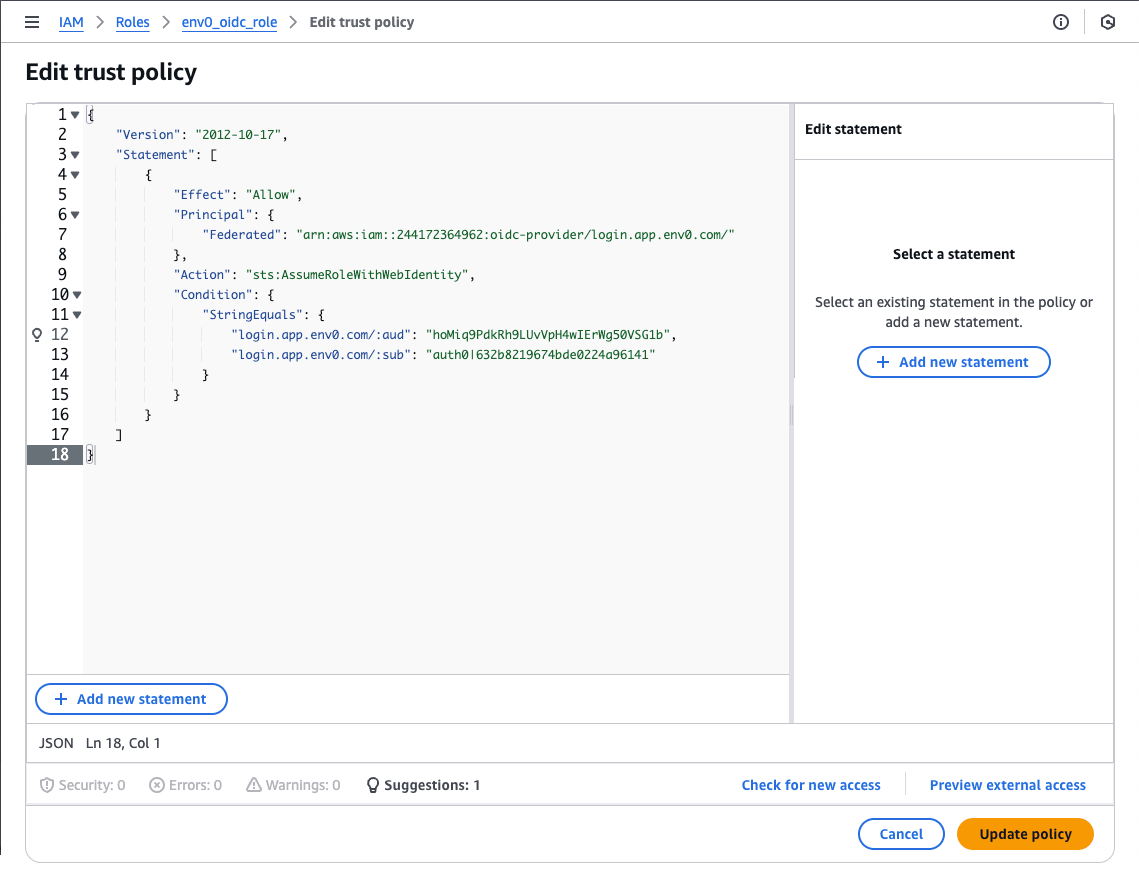
- UnderCondition, go to the StringEquals section of the Policy JSON add
"login.app.env0.com/:sub": "{your_organization_sub}"– Make sure you substitute{your_organization_sub}with the sub value you retrieved in the first step. It should be something like"login.app.env0.com/:sub": "auth0|632b8219674bde0224a96141" - Now click Update policy
{
    "Version": "2012-10-17",
    "Statement": [
        {
            "Effect": "Allow",
            "Principal": {
                "Federated": "arn:aws:iam::XXXXXXXXXXXX:oidc-provider/login.app.env0.com/"
            },
            "Action": [
                "sts:AssumeRoleWithWebIdentity",
                "sts:TagSession"
            ],
            "Condition": {
                "StringEquals": {
                    "login.app.env0.com/:aud": "hoMiq9PdkRh9LUvVpH4wIErWg50VSG1b",
                    "login.app.env0.com/:sub": "auth0|632b8219674bde0224a96141"
                }
            }
        }
    ]
}
Update Role
Self-Hosted Agent UsersFor EKS users, you will also need to add
"Action": "sts:AssumeRoleWithWebIdentity"to either your node role or service account role where your agent is running.
Custom Claims with AWS Session Tags (Optional)
AWS OIDC identity providers support only a few out-of-the-box claims, which is a limitation when you want to control who inside env0 can access this AWS role. You can read more about available claims for AWS here.
AWS lets you pass Session tags inside the JWT token, allowing you to have more control and define the right access level.
organizationId- The env0 Organization IDprojectId- The env0 Project IDtemplateId- The env0 Template IDenvironmentId- The env0 Environment IDdeployerEmail- The email address of the user who created this deployment
AWS Session Tags LimitationAs session tags have a length limitation, we will only add specific claims. These will undoubtedly give you the desired access control for your AWS role.
You can read more about AWS session tags limitation here.
In order to configure the AWS session tags, you need to edit the role you created in the previous steps:
- Go to the AWS IAM Role you created in the previous step
- In the Trust Relationships tab, click Edit Trust Policy
- Under Condition, select StringEquals for Policy JSON and add the designated claim as
aws:RequestTag/{custom_claim}. If you would like to make sure that only a specific project ID has access to this AWS role, add the following:"aws:RequestTag/projectId": ["1a433171-217e-4f58-9b4e-308d4d77902f"]- This is applicable to all custom claims mentioned above. See the full example in the image below. - Click Update policy
{
    "Version": "2012-10-17",
    "Statement": [
        {
            "Effect": "Allow",
            "Principal": {
                "Federated": "arn:aws:iam::XXXXXXXXXXXX:oidc-provider/login.app.env0.com/"
            },
            "Action": [
                "sts:AssumeRoleWithWebIdentity",
                "sts:TagSession"
            ],
            "Condition": {
                "StringEquals": {
                    "login.app.env0.com/:aud": "hoMiq9PdkRh9LUvVpH4wIErWg50VSG1b",
                    "login.app.env0.com/:sub": "auth0|632b8219674bde0224a96141",
                    "aws:RequestTag/projectId": [
                      "1a433171-217e-4f58-9b4e-308d4d77902f"
                    ]
                }
            }
        }
    ]
}
Trust Relationships With Custom Claims
Configure env0 OIDC Credential
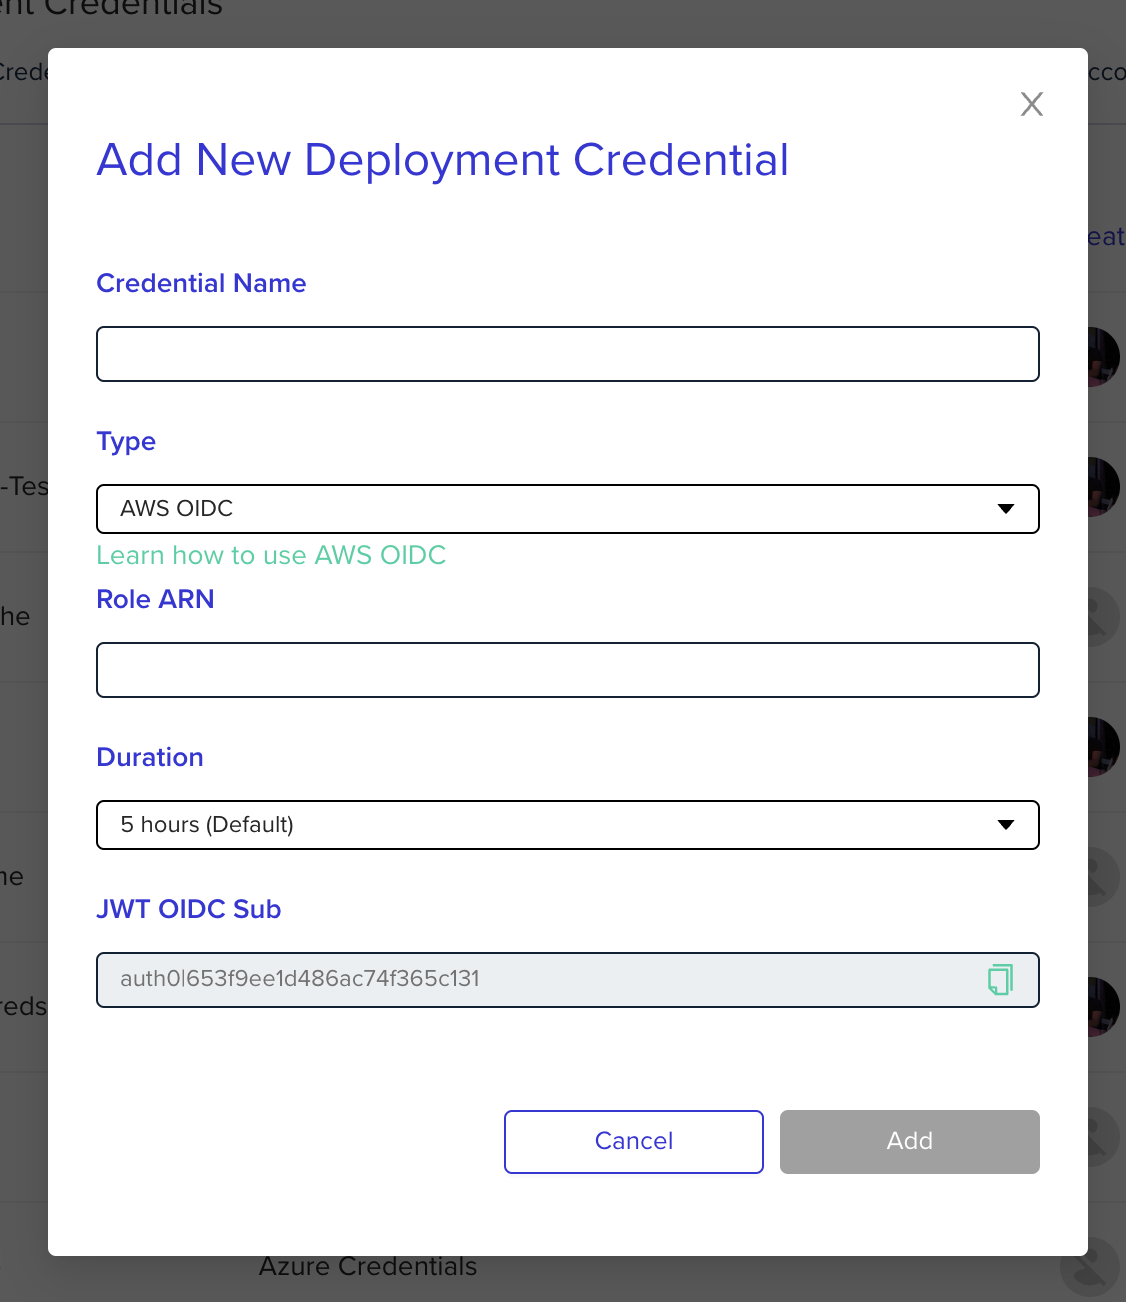
Go to the organization's credentials page and create a new deployment credential. Select AWS OIDC type and enter the following fields:
Role ARN- The ARN of the role that was previously createdDuration- Configure to 1 hour for OIDC. Determines how long the token will be valid. The token is generated when deployment starts, not when the credential is being created.
TroubleshootingNot authorized to perform sts:AssumeRoleWithWebIdentity
- Make sure your AssumeRole durations match the env0 credential and your maximum session in the role. Otherwise, try setting your duration to 1 hour.
Override Role ARN - Deploying to a Different AWS Account
If you would like to authenticate to a different AWS account within a specific environment you can override the Role ARN configuration by using an environment variable. To do so, you will need to add an environment variable named ENV0_AWS_ROLE_ARNand set the value to the role you created in your AWS account you would like to authenticate to.
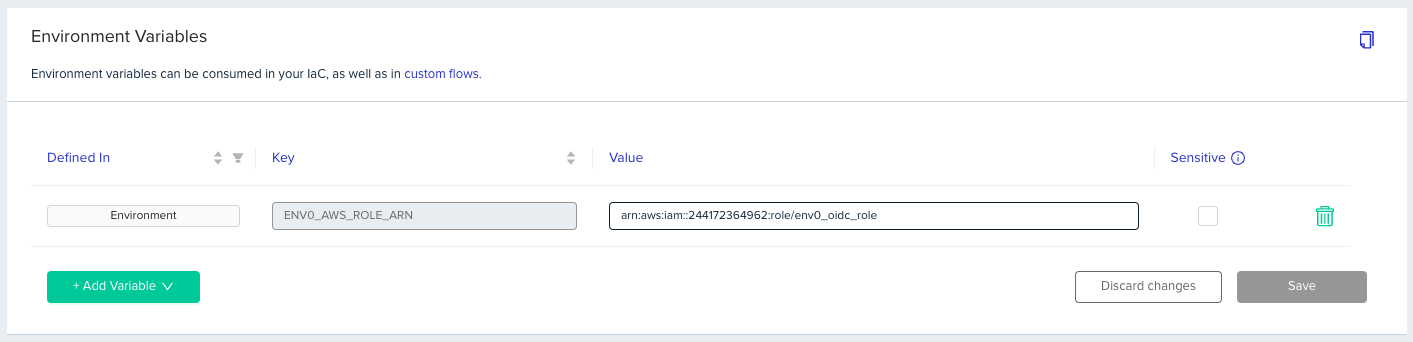
Override Role ARN
Updated 10 days ago